Monday, December 27, 2021

Amazing Silhouettes with Soft Pastels for Kylie Bertucci's International Top 10 Winners for December Blog Hop


Hi, Crafty People!
Today I'm joining Kylie Bertucci and a group of very talented demonstrators for a blog hop around the world. I'm so excited to be participating in the Top Ten International Highlights Winners Blog Hop hosted by Kylie Bertucci! I earned this honor with my card, Peaceful Cabin, placing second in Kylie's December 2021 International Highlights Challenge. Thank you to everyone who voted for my card!
The thank you card I want to share with you today is a very simple card. I've used the amazing Amazing Silhouettes stamp set (yes, I think it is an amazing set!). Let's check out the details for this card.

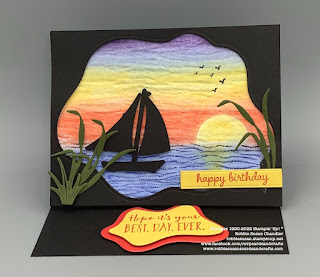
I started with a Basic Gray 11" x 4 1/4" card base folded in half. I went through the pack of Heart and Home Designer Series Paper and picked one of the designs that has wood planks on it. It was a difficult decision because there are so many to pick from! Each sheet has a variety of white wood plank designs on one side. I decided on one with narrow planks.

Next, I stamped the tree design from the stamp set in VersaMark. The Mossy Meadow chalk stick from our Soft Pastels chalk set was scribbled across the stamped design, making sure I hit all the areas that had VersaMark on it. The VersaMark is the adhering agent for the chalk. A blending brush was used to even out the chalk. This was the first time I had used this chalk, and I am loving it!

To whiten out the tree image, I colored over the tree with a Stampin' Write Chalk Writer.


Small dots were stamped randomly around the tree with Basic Gray ink. The Timber Embossing Folder gave this piece an added wood-grain look.

Small Classic Matte Dots in gray, black, and white were added to the top right. The thank you from Blessing of the Home was stamped on Basic White in Basic Gray and cut with a die from Seasonal Labels dies. The Basic Gray piece was cut with a die from Sweet Hearts dies and adhered beneath the sentiment. This piece was next adhered to the lower right-hand side with dimensionals.

Wouldn't you just love to receive or send this thank you card? If you would like to duplicate this card, some of the supplies I used are listed below with links to my store. Amazing Silhouettes stamp set, Blessing of Home stamp set, Heart and Home Designer Paper, and Sweet Hearts Dies are supplies that will not be available until January 4, 2022. Lucky you, you're getting a sneak peak of some items coming up in our January to June Mini Catalog!

Please take a minute to check out the projects from the other Top 10 Winners!


Contact Me!


Subscribe to My Blog and Newsletter
* indicates required

Join my Birthday Club!
Why, you ask! Joining my Birthday Club entitles you to a FREE stamp set! To join my Birthday Club, all you need to do is:
*Place a minimum $60 order (before tax and shipping) in my online store in the month of December. Please use the Hostess Code M9B9NNNM
*After notification of your order, I will mail you a card with a Birthday Voucher in it.
*To redeem your card in 2022, mail your voucher back to me anytime during your birthday month, indicating the FREE stamp set (I'll even pay the tax and shipping) you would like to receive for your birthday. It's as easy as that!

Product List

Tuesday, December 21, 2021

Soft Chalk Pastels Cards Classes Coming in January


Hi, Crafting Friends!
I know everyone has Christmas on their minds, but I wanted to send out the information for my next card classes that are coming up the week of January 9th. These classes are in person, only, classes held at my home.

I am so excited about these classes because we will be working with the Stampin' Up! Soft Pastels, one of our products I had not used until this week. It is so much fun and you can get many different looks. Each card we will make will use a different technique with the chalk pastels.

This class is $25 and for this price, you will make 3 cards PLUS get your own box of Soft Pastels PLUS a Blender Pen, and envelopes and printed instructions!!! January will also be Sale-A-Bration month, which means you earn free products for every $50 increment in your order, and you can take this class free with a $50 order!

Here is the schedule:
Sunday, January 9th at 2:00
Monday, January 10th at 12:00 This class is full.
Thursday, January 13th at 12:00
Thursday, January 13th at 5:00
Saturday, January 15th at 12:00

I know you would like to see the other cards in the class, so here we go.

This first card uses VersaMark with the chalk pastels to achieve this look.

The next card uses a Blender Pen, which is included in the class, to color the daffodils.

This card is a right-angle fold card.

The third card uses the Soft Chalk Pastels to create this lovely sunset background. The new Sailboat Builder punch is used to create the sailboat.

I just can't decide which card I like best! Which one is your favorite? Let me know as soon as possible which day and time you would like to attend. Come share my excitement about using these chalks with me!


Subscribe to My Blog and Newsletter
* indicates required

Sunday, December 19, 2021

Wooden Tag for Share It Sunday Blog Hop


Hi, Crafty Friends!
Today is Share It Sunday Blog Hop which means I get to share a project with you, along with a group of talented global demonstrators. My project today is a tag I created for a tag swap with my team. When you see my tag, you'll realize that it could be used for other purposes, such as a decoration or tree ornament. Let's take a look at my tag.


I used wooden rings I purchased from Amazon to construct my tag. The top ring I stamped a tree from the stamp set Evergreen Elegance, using Evening Evergreen ink. 


The next circle I stamped Joy and a couple of spruce sprigs, both stamps from Merriest Moments.


The last circle was stamped with a pinecone from Christmas Season and the spruce sprig. The center of the pinecone was sponged with Soft Suede ink.


After stamping all the circles, I lightly sponged the outer edges with Soft Suede ink and a Blending Brush, then applied Wink of Stella to the stamped images to give them some sparkle. I also adhered Brushed Metallic Adhesive Backed Dots to the holes to cover them. 

The ribbon I used in the first picture is from the August-December Mini, Cherry Cobbler and Gold, but I had some Shaded Spruce retired ribbon I tried also, and, honestly, I like it better. Check it out below. A hot glue gun was used to adhere the circles to the ribbon. The Tombow Multipurpose glue also works but leaves a sticky area on the back of the ribbon. A little embossing buddy took care of that. I added a To and From tag to the top back.

This project was a lot of fun to make. You should give it a try. All stamp supplies are listed below with links to my store.

Please take a minute to visit the blogs of all the talented demonstrators listed below.


pii
Subscribe to My Blog and Newsletter
* indicates required


Join my Birthday Club!
Why, you ask! Joining my Birthday Club entitles you to a FREE stamp set! To join my Birthday Club, all you need to do is:
*Place a minimum $60 order (before tax and shipping) in my online store in the month of December. Please use the Hostess Code M9B9NNNM
*After notification of your order, I will mail you a card with a Birthday Voucher in it.
*To redeem your card in 2022, mail your voucher back to me anytime during your birthday month, indicating the FREE stamp set (I'll even pay the tax and shipping) you would like to receive for your birthday. It's as easy as that!
Product List

Thursday, December 16, 2021

Simply Elegant Decorative Bag for Happy New Year's Blog Hop


Hi, Crafty Friends!
Today I'm participating in a blog hop with a group of talented, global demonstrators, featuring ideas for New Year's. My first thought, of course, was a card, but then I started thinking about all the New Year's Eve parties people go to and decided on something different - a decorative bag! Many times, when you go to a party, you take the host or hostess a gift. So why not have a beautiful, decorated bag you did yourself?!

For this bag I used a piece of Simply Elegant Designer Series Paper and the Parisian Flourish Embossing Folder. I felt they complicated each other. The bag is from the Dollar Tree and is the smallest one that is 3 for $1.

First, fold the bottom of the bag so the bottom is folded in, as in the picture below.


VersaMark was patted all over both sides of the Parisian Flourish embossing folder.

I laid the bag inside the embossing folder, covering the bottom part of the bag.

When you put the embossing folder into the Cut and Emboss machine, make sure you put the handles in first. Also, when you get to the bottom part of the bag, run it back and forth through the rollers several times. This area is thick and takes a little more pressure than the rest of the bag.

The side of your bag will be embossed, but I didn't  apply embossing powder to the sides.

Now you need to lay your bag on a sheet of paper and sprinkle gold embossing powder all over both sides, then heat emboss them.

This is a close-up view of the bottom of the bag after heat embossing. I also embossed a 1" gold foil strip to cover the area between the designer series paper and the embossed area.

Some pieces of matching ribbon add the finishing touch. You can also see where I adhered the designer series paper above the embossed area.
Now you have a beautiful bag in which to present your lovely gift.

The bag pictured below is another bag I made using the Simply Elegant Designer Series Paper, but I felt the retired Tin Tiles embossing folder complimented this design better than the Parisian Flourish. Copper foil and embossing powder to match the colors in the designer series paper was used on this one. I also made a coordinating tag to go on the bag.

I hope you like my project and will give it a try. It is a fun project to do, and the possibilities are endless!

Now please take a minute to hop on over to the other talented demonstrators and check out their projects. 


Subscribe to My Blog and Newsletter
* indicates required


Join my Birthday Club!
Why, you ask! Joining my Birthday Club entitles you to a FREE stamp set! To join my Birthday Club, all you need to do is:
*Place a minimum $60 order (before tax and shipping) in my online store in the month of December. Please use the Hostess Code M9B9NNNM
*After notification of your order, I will mail you a card with a Birthday Voucher in it.
*To redeem your card in 2022, mail your voucher back to me anytime during your birthday month, indicating the FREE stamp set (I'll even pay the tax and shipping) you would like to receive for your birthday. It's as easy as that!