Hello and welcome to Kylie Bertucci's International Winners Blog Hop! Today I'm joining Kylie Bertucci and a group of very talented demonstrators for a blog hop around the world. I'm so excited to be participating in the Top Ten International Highlights Winners Blog Hop! I earned this honor with my card, Soft Pastels Sunset and Boat card. Thank you so much for voting for me.
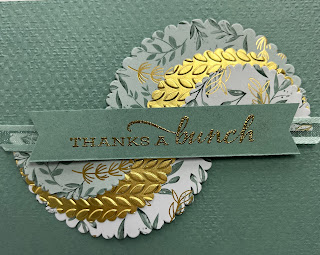
The technique I'm sharing with you today is called the split circle technique. Basically, you cut 3 different size circles, then cut them in half. The 3 different sizes are then arranged on top of each other, but I'll cover this step by step. The hardest part is deciding which designer series paper you want to use.
I started with an 11" x 4 1/4" card base of Thick Basic White. The next layer is a 4" x 5 1/4" piece of Soft Succulent. I embossed the Soft Succulent piece with the Tasteful Textile Embossing Folder.
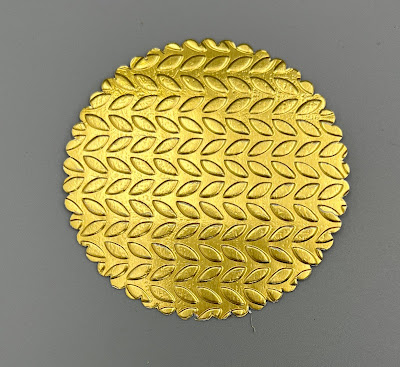
I decided to use the Ever Eden Designer Series Paper and gold foil, but you could use your favorite paper. The Layering Circle dies were used and I fancied it up a bit and use the scalloped-edged one.
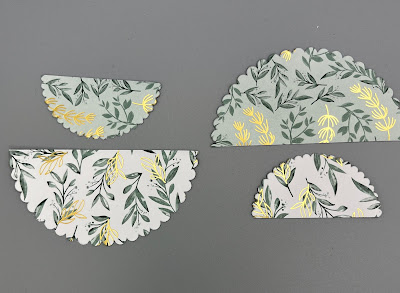
The larger circles were cut with the largest die and the smaller circle with the 4th from the smallest. You will need to cut 2 of each. This is actually going to be enough circles for 2 cards.Next, you cut all the circles in half, as pictured below.
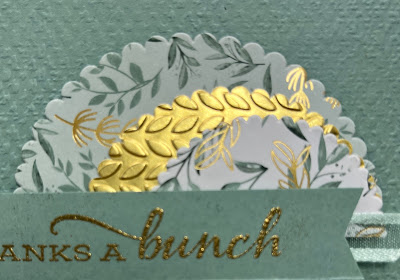
The designer series paper is arranged in opposite order and the gold is added in the middle.
This next step is SUPER important! Line all the circles up even on one side or the other, making sure you line both halves up the same direction. I chose to line mine up with the bottom corners even on the right side. When you do this, your pattern will flow from top to bottom as shown below.
I added a strip of Open Weave Ribbon in Soft Succulent under the sentiment.
Below are 3 other card ideas with this technique.
Wouldn't you just love to receive or send this thank you card? If you would like to duplicate this card, the supplies I used are listed below with links to my store.
Please take a minute to check out the projects from the other Top 10 Winners!
January and February are Sale-A-Bration months!! What does that mean, you ask? Well, I'm glad you asked, because it means that for every $50 increments in your order, you can receive free Sale-A-Bration items, like the designer series paper I used today. There are special products available when your order is $100!
Wait, there's more! If you would like to join my team or become a discount shopper, Stampin' Up! has added an extra incentive. Along with receiving $125 for $99 (no shipping fee, just tax added), you also will receive 2 extra stamp sets of your choice from any current stamp sets. Wow!! So, click here to join my team!
Subscribe to My Blog and Newsletter


Thanks Robbie for sharing the split circle technique! Four beautiful cards. Congrats on making it to the Top Ten Blog Hop this month!
ReplyDeleteThank you much, Kylie!
DeleteBeautiful cards, Robbie! I especially like the ladybug one! Congratulations on being in the Top Ten (again!!)! ~ Kim Kroeker
ReplyDeleteThank you, Kim!
DeleteThank you so much!
ReplyDeleteI have made similar cards but yours are much nicer. The gold really makes a difference. Also I really like the daisy one - I had not considered using the half circles in that way. Thank you for the idea.
ReplyDeleteThank you for your kind words!
DeleteYour featured card is stunning! I've been admiring split-circle cards for a while, but your samples have put this on my must-do list. Thanks for the inspiration.
ReplyDeleteThank you for your kind words!
DeleteOh! Thank you so much for sharing this card and the variations. Have used this method for plain circles but not thought to emboss them. Now why didn't i think of that? Thanks for sharing.
ReplyDeleteYou’re welcome. Great technique! As they say, you learn something new everyday!
Delete