
.jpg)
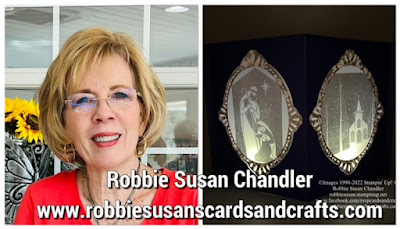
Hello and welcome to Fa La La Friday Holiday Projects! This is week 10 of 10 weeks, but that's not to say it's the last Christmas card I'll post before Christmas. You're going to love this card! As you can see from the picture above, it lights up when you put battery-powered tealights behind the panels. I'm going to include a lot of pictures in this post, but there is also an instructional video included.
Update on my December Monthly Toolbox. December has sold out. Look for the January Toolbox around the first of January. Now, let's get started on this fabulous card.
This a look at the front of the card.
.jpg)
.jpg)
.jpg)
.jpg)
Apply VersaMark to the Quatrefoil Tile Embossing folder.
.JPG)
.JPG)
.JPG)
Sprinkle silver embossing powder on the Starry Sky piece and heat with a heat gun.
.JPG)
.JPG)
Adhere this piece to the front of a 8 1/2" x 5 1/2" piece of Starry Sky cardstock folded in half.
.JPG)
.JPG)
Cut the centers of an 8 1/2" x 5 1/2" piece of Starry Sky cardstock folded in half. It is possible to cut both at the same time.
.JPG)
Adhere one of the frames cut from the inside piece to the card front.
.JPG)
.JPG)
.JPG)
Stamp the sentiment on Starry Sky cardstock in VersaMark and heat emboss with silver embossing powder. Adhere over the center of the Splendid Day oval with dimensionals.
.JPG)
.JPG)
The inside piece is a 5 1/2" x 8 1/2" piece of cardstock scored at 1/4", 4 1/4", and 8 1/4".
.JPG)
On two 3 7/8" x 5" pieces of vellum cardstock, stamp the church and nativity scene from Peace to You in VersaMark and heat emboss with silver embossing powder.
.JPG)
.JPG)
.JPG)
.JPG)
.JPG)
Apply Tear and Tape to the 1/4" end sections of the inside piece. Adhere this piece to the inside of the card front piece.
.jpg)
Stamp the sentiment on a 4" x 5 1/4" piece of Basic White paper in Starry Sky and adhere to the back of the card.
.JPG)
Now you have completed your card. Separate the two sections and drop one or 2 battery-powered tealights inside. I prefer 2 to make it brighter.
.JPG)
If you would like to see a video detailing the construction of this card, check out my video below:
Click on the box below for a free tutorial:

I hope you like this card and would like to give it a try. Shopping links to the supplies I used are listed below.
Thanks for visiting my blog!

Subscribe to My Blog and Newsletter
 |  |
 | |
 |  |
") |  |
")
")


 Specialty Designer Series Paper")

 Cardstock")
What a stunning card/idea. Thank you for sharing your creativity.. Mz Cookie
ReplyDelete