Monday, January 30, 2023

Two-Tone Flora Thank You Card for Kylie Bertucci's International Blog Highlights Winners Hop

Two_Tone_Flora_Thank_You_Shimmer_Paper_Stampin_Up
Hello and welcome to Kylie Bertucci's International Winners Blog Hop! Today I'm joining Kylie Bertucci and a group of very talented demonstrators for a blog hop around the world. I'm so excited to be participating in the Top Ten International Highlights Winners Blog Hop! I earned this honor with my card, Seaside Bay. Thank you so much for voting for me.

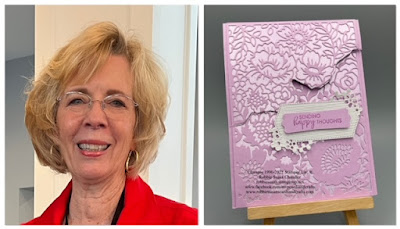
The card I'm sharing today features a die from the Two-Tone Flora die set and the gorgeous Fine Shimmer Paper in Fresh Freesia. All measurements and instructions will be available in a free download below. I also have a video for you!!

Two_Tone_Flora_Thank_You_Shimmer_Paper_Stampin_Up

As you can see from this side view, I decided to cut the die into two parts, to add some interest to this card.
Two_Tone_Flora_Thank_You_Shimmer_Paper_Stampin_Up

This diagram shows exactly where I cut the die. You have to adhere the die cut Fresh Freesia piece to the Fine Shimmer Fresh Freesia paper, then adhere this piece to the card front BEFORE you cut it into the two pieces.
Two_Tone_Flora_Thank_You_Shimmer_Paper_Stampin_Up
After you have cut the card front into the 2 pieces, the inside Basic White piece needs to be adhered to the card inside. Next, adhere the bottom of the card front onto the bottom part of the card base.
Two_Tone_Flora_Thank_You_Shimmer_Paper_Stampin_Up

The only part that opens in the top half.
Two_Tone_Flora_Thank_You_Shimmer_Paper_Stampin_Up

This is what the inside looks like when opened up.
Two_Tone_Flora_Thank_You_Shimmer_Paper_Stampin_Up

Click on the box below for your free tutorial!
And, as an added bonus, I have an instructional video for you! Just click on the box below.

I hope you like my card, and if you should want to try to duplicate it, I have provided links to the products used. 

Please take a minute and visit the blogs of the other Top 10 Demonstrators. Thanks for stopping by!


Monthly_Crafty_Toolbox
Check out my Monthly Crafty Toolbox you can receive each month if you live in the USA. Click here for all the information.

Stampin' Up is offering a fantastic "join my team" special! When you sign up in January or February, you can choose from three incredible options: 
  • Option 1: The exclusive Boho Blue Mini Machine ($63 value) + your choice of $175 of Stampin’ Up! products for only $129!
  • Option 2: The original white Mini Machine ($63 value) + your choice of $175 of Stampin’ Up! products for only $129!
  • Option 3: Your choice of $175 of Stampin’ Up! products for only $99!
  • I would love to have you join my team! Click here to begin the journey with me!


Subscribe to My Blog and Newsletter
* indicates required
Product List

Wednesday, January 18, 2023

Valentine's Day Card for the Crafty Collaboration Valentine's Day Blog Hop

Country_Bouquet_Framed_Florets_Valentine's_Day_Stampin_Up


Hello and welcome to my blog! Today I'm hopping with a talented group of demonstrators. Our theme today is Valentine's Day cards. The card I'm sharing today is one my customers will be making next week at my in-person card classes. 
Country_Bouquet_Framed_Florets_Valentine's_Day_Stampin_Up

This card's focal point is the Framed Florets dies, Vellum Basics Specialty Designer Series Paper, and the Country Bouquet bundle. I'll share pictures of the Valentine's Day card, then provide a link for a free tutorial with all the measurements, supplies, and instructions.


The Real Red piece was embossed with Timeworn Type Embossing Folder. The large hearts were punched with the County Bouquet punch, and the Bough punch provided the Shaded Spruce pod stems.

Country_Bouquet_Framed_Florets_Valentine's_Day_Stampin_Up

The tiny hearts and oval were cut with a die from Framed Florets and the leaves with a die from Around the Bend. That lovely white paper is actually vellum from the Vellum Basics Specialty Paper pack.
Country_Bouquet_Framed_Florets_Valentine's_Day_Stampin_Up

The inside was stamped with the Country Bouquet stamp set.
Country_Bouquet_Framed_Florets_Valentine's_Day_Stampin_Up

Country_Bouquet_Framed_Florets_Valentine's_Day_Stampin_Up

Click on the box below for your free tutorial. For your convenience, I have provided links to all the supplies I used to make this card.
Thank you for visiting my blog. Please take a minute and visit the blogs of the awesome demonstrators below. 


Subscribe to My Blog and Newsletter
nk">
* indicates required
Product List

Monday, January 16, 2023

Valentine's Day Cards for my next In-Person Classes Next Week


Hello and welcome to my blog. My next in-person classes are coming up next week and we'll be making Valentine's Day Cards. 

Make at Home Card Kits
I'm also going to provide Make at Home Card Kits for these cards for anyone who places a minimum $50 order using Hostess Code PJCJPR3W. Click here to go directly to my store. Precut cardstock, papers, and diecuts for 3 cards will be included in the kits. Per Stampin' Up! rules, no stamped images will be included.

For my in-person class, you will make 3 cards and the cost is $20. Envelopes and printed instructions are included in the class. All you need to bring are your scissors and adhesives. The schedule is as follows:

Monday, January 23rd at 5:00
Thursday, January 26th at 12:00
Sunday, January 29th at 2:00

Below are the cards you will make at class and in the kits. These cards can also be modified for All Occasion if you're not interested in Valentine's Day Cards.


If I see an order under my order history with the above Hostess Code, then I will automatically mail you the card kits. Make sure you allow me to contact you when you place your order, or I won't be provided your mailing address. Here's the shopping link.

Let me know which day you would like to attend. Hope to hear from you!


Subscribe to My Blog and Newsletter
* indicates required